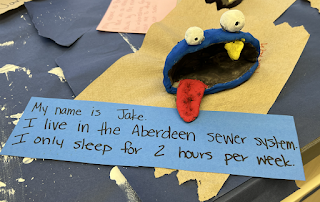
Description - To begin this activity, I wedged the clay. The first step of wedging was to knead the clay, which is like kneading dough. Once I got done kneading the clay, I threw the clay onto the table to make sure that I got all of the air bubbles out. After a few times throwing the clay at the table, I used my hands to form the clay into a ball. When I got the clay into the ball shape that I wanted, I began to pinch the clay. Pinching clays is when you rotate the clay in your hands and push your thumb down in the center of the clay. I continued to pinch my clay until I got the thickness around the outside that I wanted. It looked like a bowl when I was done pinching it. After I got done pinching it, I used the bowl and shaped it into the mouth of my monster. Once I got the mouth to look the way I wanted, I began to use additives and subtractives. The additives that I added were the eyes, tooth, and tongue. In order for the additives to stay, I had to create x marks on both the clay that I wanted to add and on the mouth. After I made x marks on both, I got my fingers wet with water and wiped the water on the x marks. Then, I placed my additive onto the x marks on my base. I used a carving tool to then attach the edges of my additive to the base. This made it so that the clay would stay attached to each other. After I added everything, I used a carving tool to do the subtractives. The subtractives that I did were dots on the eyes, zigzags on the back, and x marks on the top of the tongue. Finally, I painted my monster and then let it dry.
Extension Activity - Another activity that uses clay is a clay wall pocket. To begin this activity, every student would receive a ball of clay that is about the size of a baseball. They will flatten the ball between their hands. Then, the students will set it down and use a roller to roll the clay until it is even. The students will repeat those steps with a smaller ball of clay. After the students do it with the second ball, they will cut the smaller one in half and add the smaller one to the larger one. They will make x marks on both flattened pieces of clay. Then, the students will use get their fingers wet and put water over the x marks that they made. The students will then attach both clay parts together and use a clay tool to even out the edges so that the clay pieces will stay together. The students will curve the smaller piece to form the pocket. When they are done forming the pocket, the students can add any more additives and subtractives to the pocket that they would like. When they are done adding and subtracting things, the students will paint the wall pocket and let it dry.
Comments
Post a Comment