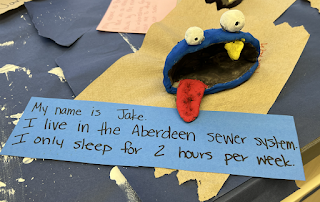
Posts

Showing posts from December, 2021

3D Monster

Image
  Description - To begin this acitvity, I folded the face. I folded about an inch on each side in and then glued one side to the background. In order for it ot stand up, I glued the second side in a little bit more than the other side. Once I was done gluing my face, I created the eyes but cutting out circles and adding the design. Then, I used the crimp folding method to create the red strings. I cut my mouth out and glued everything to the face. After I finished the face, I rolled two pieces of a paper into small tubes to create the necks. Finally, I cut the body out and used a sharpie to make pocka-dots on the body. Extentsion activity - Another 3D activity that I would use is paper sculptures. To begin, the students would cut a piece of cardboard square. The square can be any reasonable size that they would like. After the students get their cardboard square, they will roll up different sizes and lengths of paper. The students can make as many circles as they would like, but it has

Pinch Pot Monster

Image
  Description - To begin this activity, I wedged the clay. The first step of wedging was to knead the clay, which is like kneading dough. Once I got done kneading the clay, I threw the clay onto the table to make sure that I got all of the air bubbles out. After a few times throwing the clay at the table, I used my hands to form the clay into a ball. When I got the clay into the ball shape that I wanted, I began to pinch the clay. Pinching clays is when you rotate the clay in your hands and push your thumb down in the center of the clay. I continued to pinch my clay until I got the thickness around the outside that I wanted. It looked like a bowl when I was done pinching it. After I got done pinching it, I used the bowl and shaped it into the mouth of my monster. Once I got the mouth to look the way I wanted, I began to use additives and subtractives. The additives that I added were the eyes, tooth, and tongue. In order for the additives to stay, I had to create x marks on both the cla

Stained Glass Flower

Image
  Description - For this activity, I began by choosing a picture of an object that was provided by the instructors. After I chose what object I wanted to do, I placed it behind a clear sheet of paper and traced it with a sharpie. Once I was done tracing it, I then used lines to create shapes around the background of my picture. When I was done creating the shapes, I used warm colors to color in my flower. I colored in the flower is the warm color sharpies. After I was done with coloring the flower, I used cool colored sharpies to color in the background shapes. When I was done coloring in the entire background, I used puffy paint to outline my flower. This caused the flower to stand out more than the background.  Extension Activity - A different activity that I would use with stained glass is by using tissue paper. To begin the activity, I would allow the students to brainstorm what shape they would like to use to create their stained glass. Once they have decided what shape they would

Printmaking Design

Image
Description - To begin this project, I had to draw three different designs onto a small square sheet of paper. After I had drawn all three, I then picked which design I liked the best. Then, I used a foam square and placed my drawing on top of it. I took a pencil and pushed my drawing into the foam square. I had to make sure that my drawing was deep enough into the square so that when I went to print it, it would show up. After I was done transferring it onto my foam square, I picked twelve different colors of construction paper squares to put my print onto. Once I choose all of my squares, I went to a station that had ink on it. I used a roller and rolled the ink onto my foam square and then flipped it onto the construction squares and pressed done. I repeated those steps on all twelve of my squares. I was able to use either white ink, black ink, or both. Once I had put my drawing onto each of my squares, I created a pattern on a larger sheet of construction paper and glued the square

Animal Mosaic

Image
  Description - To begin this activity, we chose an animal that was provided. The instructors had several different pictures of different animals on the front table that we could choose from. Once I had chosen my animal and picture, I began to sketch it out on a white piece of construction paper. After I was done sketching it out, I picked construction paper that was already cut into small squares. They had several different colors to choose from. Once I had picked all of the colors I wanted, I began to rip and glue them to my sketch. I was able to make the squares as small as I wanted. I had to make sure that I filled up the majority of the paper with colored construction paper. There was supposed to be very little showing between the construction squares.  Extension Activity - Another activity that I would use with paper and creating a mosaic would be to have the students create a landscaping mosaic. The students would be able to choose whatever type of landscaping they would like. I

Van Gogh Flowers

Image
  Description - When beginning this activity, the instructor placed different pictures that Van Gogh had painted. Everyone was able to pick one of the pictures that they had on the board to draw based off of. I chose one that had sunflowers in it. I began by lightly tracing my flowers with a pencil. Once I was done with that, I began painting my picture. While I was painting, I used a fork to create the movement in my picture. I had to make sure that I created the lines while I was painting. I begin painting the flowers first and made the lines when I got done with one of the flowers. Then, I began painting the stem and used the fork to create the lines once I was done painting parts of the stem. Finally, I painted the background of the image. I would paint in small sections and create the movement as I was going along. Extension Activity - Another activity that I would do with painting is having the students create a Van Gogh painting using rice and paint. The students sketch out what