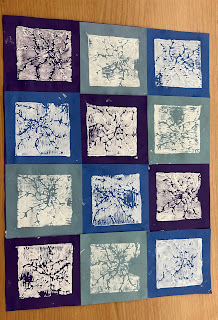
Description - To begin this project, I had to draw three different designs onto a small square sheet of paper. After I had drawn all three, I then picked which design I liked the best. Then, I used a foam square and placed my drawing on top of it. I took a pencil and pushed my drawing into the foam square. I had to make sure that my drawing was deep enough into the square so that when I went to print it, it would show up. After I was done transferring it onto my foam square, I picked twelve different colors of construction paper squares to put my print onto. Once I choose all of my squares, I went to a station that had ink on it. I used a roller and rolled the ink onto my foam square and then flipped it onto the construction squares and pressed done. I repeated those steps on all twelve of my squares. I was able to use either white ink, black ink, or both. Once I had put my drawing onto each of my squares, I created a pattern on a larger sheet of construction paper and glued the squares to that construction paper.
Extension Activity - A different activity that I would do with printmaking would be by using rubber bands. Each student would receive a 6" by 6" piece of cardboard and a handful of rubber bands. The students will wrap the rubber bands around the cardboard however they would like. Once they are done wrapping the rubber bands, they would paint them one color. After they are done painting it one color, then they would press it onto a white sheet of construction paper. Then, they would remove those rubber bands and place new ones on. The students would paint those rubber bands a different color and then press them in a different direction on the same piece of construction paper. The students would be able to do this as many times as they would like, but they would have to complete it at least three times using three different colors.
Comments
Post a Comment